If you use a Mac, you may have noticed that iCloud automatically syncs your data with other Apple devices like iPhone and iPad. While this feature is great for keeping your files, photos, and notes the same everywhere, sometimes you may want to stop it.
Maybe you want to save space, protect your privacy, or just keep some things only on your Mac. Whatever your reason, turning off iCloud is very simple. In this article, you will learn step-by-step how to turn off iCloud on a Mac in the easiest way possible.
What Is iCloud and Why People Use It
iCloud is Apple’s online storage system. It keeps your photos, files, emails, and settings safe on Apple’s servers. That way, you can open the same files or photos on any of your Apple devices. For example, if you take a picture on your iPhone, it will automatically appear on your Mac or iPad.
But sometimes, people don’t want everything shared. You may want to stop automatic syncing to protect personal data or save your internet data and storage space. Turning off iCloud is a simple way to do that.
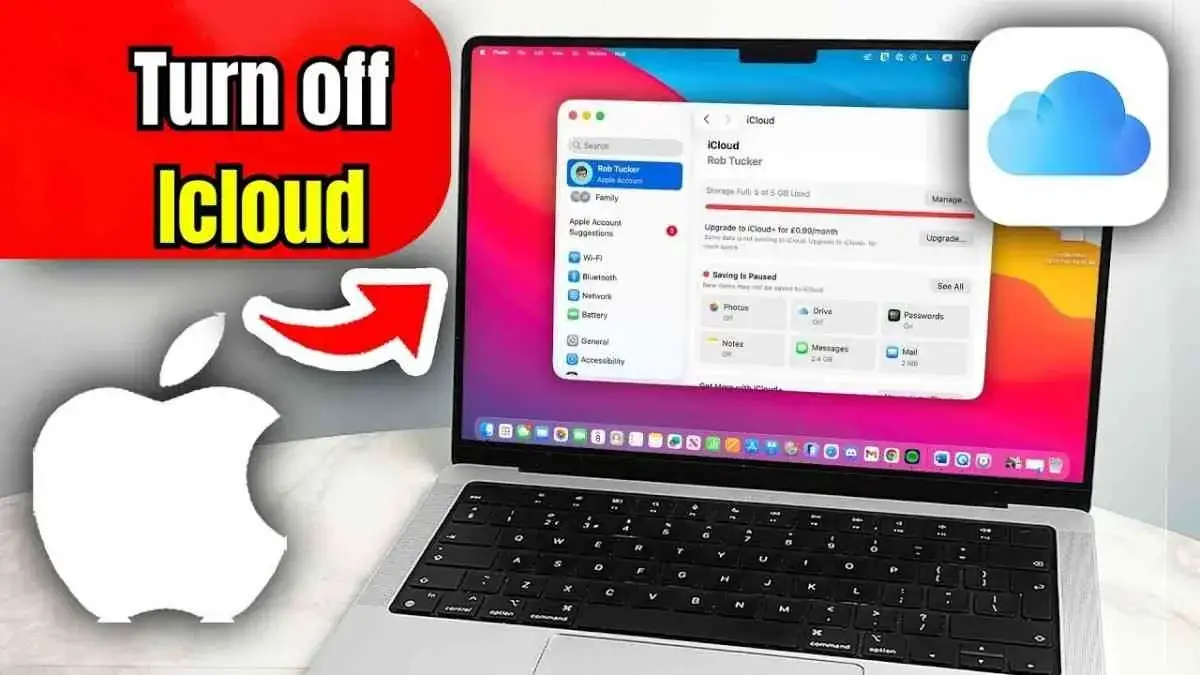
Step-by-Step How to Turn Off iCloud on a Mac
Step 1: Open System Settings
Go to the bottom of your screen and open the dock. Find System Settings (you can also search for it by typing in the top right corner of your screen).
Step 2: Open Apple Account Settings
Once the System Settings window opens, look at the top left side and click on your Name or Apple ID. This will open your Apple Account settings.
Step 3: Go to iCloud
Scroll down and find the iCloud option. Click on it to open the list of apps and features that use iCloud.
Step 4: See All Apps Using iCloud
Next, you will see a section called Apps Using iCloud. Click See All on the right side. This will show all the apps that are currently saving data to iCloud, such as Notes, Photos, Contacts, and more.
Step 5: Turn Off the Apps You Don’t Want
If there are apps you don’t want to sync with iCloud, you can turn them off one by one. For example, if you don’t want your Notes to be saved online, click Notes and turn off the switch. Do the same for any other app you want to stop syncing.
Keep doing this until all the apps you want are turned off.
Also Read : how Aadhaar Photo Change manually step by step click below
Aadhaar Photo Change: Aadhaar card is one of the most important identity documents in India and is widely used for banking services, government schemes, SIM verification, and many other official purposes. When the photograph on the Aadhaar card is unclear, very old, or does not match the current appearance of the cardholder,
aadhaar photo change becomes necessary to avoid verification problems. Many people face difficulties because their Aadhaar photo was captured years ago or was not taken properly at the time of enrollment. To solve this issue, the government has provided a simple, safe, and official process for
aadhaar photo change through authorized Aadhaar enrollment or update centers, ensuring that the data remains secure and authentic.
An incorrect or unclear photograph can create problems during identity verification, as banks, telecom companies, and government offices rely heavily on Aadhaar data.
This is why aadhaar photo change is strongly recommended if the photo is blurry, outdated, or causes a mismatch during verification. Completing an aadhaar photo change helps ensure smooth access to services and prevents unnecessary delays in important work. A clear and updated photo makes the Aadhaar card more reliable and reduces the chances of rejection during official checks.
The aadhaar photo change process is part of the Aadhaar demographic update service and follows strict security guidelines. At present, aadhaar photo change cannot be done completely online from home. The update is carried out only at authorized Aadhaar centers to maintain data safety and authenticity.
During the aadhaar photo change process, the photograph is captured live at the center and directly updated in the UIDAI system after biometric verification. This ensures that the update is genuine and linked correctly to the Aadhaar holder.
For aadhaar photo change, no additional document is required if you are updating only the photograph. After submitting the request, the aadhaar photo change status can be tracked online, and the update is usually processed within a few days. Once approved, the updated
Aadhaar can be downloaded easily. The entire aadhaar photo change process is completely legal, government-approved, and handled only by authorized centers. It is always advised to avoid third-party agents or unofficial websites that claim instant online aadhaar photo change, as such claims are misleading and unsafe.
Continue with this topic
Extra Tip: Sign Out of iCloud Completely
Turning off iCloud can be useful for many reasons.
1. Save Storage Space – iCloud gives only limited free space (usually 5 GB). Turning it off helps save that space for more important files.
2. Privacy and Security – Some users prefer keeping personal files offline for extra privacy.
3. Better Speed – Turning off background syncing may make your Mac run faster.
4. Control Over Files – You can manage what stays on your device and what doesn’t.
5. Avoid Data Overuse – iCloud syncing uses internet data. Turning it off can help if you are on a limited plan.
What Happens After You Turn Off iCloud
When you turn off iCloud, your files will stop syncing automatically. You will still have the files already downloaded on your Mac. Any new changes you make will stay only on your Mac and won’t appear on your iPhone or iPad. If you sign out completely, you might be asked whether you want to keep a copy of your data on your Mac — always choose Keep a Copy if you don’t want to lose anything.
Read more : How to Fix High Ping in Roblox! Lower Ping In Roblox problem slove
Read more : Agentkit New ChatGPT Feature Kills Gemini and N8N
Best Practices Before Turning Off iCloud
Before you turn off iCloud, make sure to back up your data. You can use an external hard drive or Apple’s Time Machine to keep a local backup. This ensures you do not lose important files or photos.
Also, make sure you have access to your Apple ID login details in case you want to turn iCloud back on later.
Final Thoughts
Turning off iCloud on a Mac is simple and safe. You can do it anytime if you want more control over your data. By following the steps above, you can choose which apps to sync and which to keep private. Whether it’s for privacy, performance, or storage reasons, you’re now ready to take charge of your iCloud settings with ease.
FAQs
Q1: Will I lose my files if I turn off iCloud on my Mac?
No, your existing files on your Mac will stay safe. Only syncing stops.
Q2: Can I turn iCloud back on later?
Yes, you can go back to System Settings and turn iCloud back on anytime.
Q3: What happens to my photos after I turn off iCloud?
Photos will stop syncing between devices, but the ones already on your Mac will stay.
Q4: Does turning off iCloud improve Mac performance?
It can help your Mac run faster since fewer background syncing tasks are running.
Q5: Can I turn off iCloud for only some apps?
Yes, you can choose to turn off iCloud for specific apps like Notes, Contacts, or Photos without turning off everything.